Easy to install and upgrade
That’s right: you don’t need a genius technician to install a smart LED. You’re smart enough to do it yourself. We’ve created a short introduction on how to start your own smart lighting
solution in your home:
Set up your own smart lighting installation
First, choose the room you want to make smarter. We recommend the living room since that’s usually where people spend most of their time, and because it’s used for lots of different activities. Of course, which room you choose is totally up to you. After picking a room, figure out what the main function of the room is. This is what we’ll use as a starting point. Are you mostly here to relax, do you study here, or do you welcome your guests in here? Let’s say you mostly use this room to relax. In that case, you won’t need a lot of high-intensity lights. If you use the room to study, make sure to take into account that you might need the high-intensity lights. With the Innr app you can make a bright room dark, but it’s impossible to brighten a room that doesn’t have enough lights in them. Next up is checking what you want to accentuate in the room. A few spots on a curtain can make a small room seem bigger, but adding a spot to accentuate a small bookshelf can make it feel cozy and small.
Finally, you want to find out whether you want to accentuate something. Most rooms have a centerpiece like a fireplace, a television set, or a bookshelf. To explain a few of the basic Innr
concepts we’ll use this next example to show you what a few small lights and a LED strip can do to accentuate a centerpiece bookcase.
Accentuating a centerpiece with smart LEDs
What you’ll need
- A few decorative pieces such as a small painting, a plant or a vase.
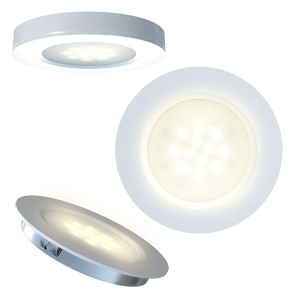
- One or two sets of Smart Pucks
- Or or 2 Flex Colour LED strips
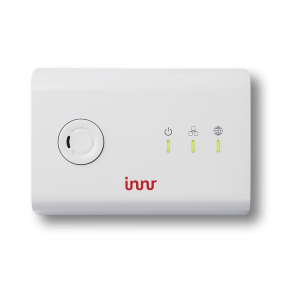
- 1 Innr Bridge
- The Innr App
Step 1
Figure out which shelves you want to highlight. The Smart Pucks can accentuate specific decorative pieces, while the Flex LED strip provides an overall ambient light around the bookcase.
Step 2
Connect the Bridge to the home WiFi network and use the Innr app to create a separate room named ‘bookshelf’.
Step 3
Use the Innr app to find the lights you’re planning to mount in the bookshelf.
Step 4
Test the light of the Flex LED strip and then mount it on the bookshelf. Make sure to mount it somewhere out of sight, for example above eye level, but at the bottom of a shelf. If you’re happy with its position, connect the strip to the control box and adapter, but don’t mount it yet.
Step 5
Test the light of the Smart Pucks by holding them in different positions in the bookshelf. Try if the light works best coming from above, below, or from the sides. A general rule of thumb is to use two Pucks on the bottom of the top shelf, aiming downwards. Place them there, but don’t mount them yet.
Step 6
Turn on all lights and have a seat in the room. Double check if you’re happy with the lighting and don’t forget to check it from different positions. If you’re 100% certain they’re in the perfect position, then you can start mounting them.
Step 7
Cut the Flex Strip to the perfect size and use the included tape to mount them. Mount the Pucks their corresponding tape as well.
Step 8
Now the fun begins. Start using the Innr app to play with different lighting settings. Create multiple scenes for different occasions.
You can do this by following the next steps:
- Create a name for a scene
- Choose a type of scene
- Set the lights to your preferred setting for this scene
- Save the scene
Keep in mind that only one scene can be active per room. Of course, this was only just the centerpiece. You can apply the same techniques to make the entire room smart. For more inspiration on how to make your living room smarter, check this article about the endless possibilities of smart lighting. The last thing we want to mention in this article is how to make your home safer using the same smart lighting we just installed.